I'm documenting the renovation of my 1929 "English Cottage"-style house located in the Irvington Historic District in Portland
Author: Bill Dickens
I grew up on a hill country farm in New Zealand, then lived and worked in Hong Kong. I moved to Portland, Oregon in 2009. I'm presently renovating my 1929 "English Cottage" house in the Irvington Historic District.
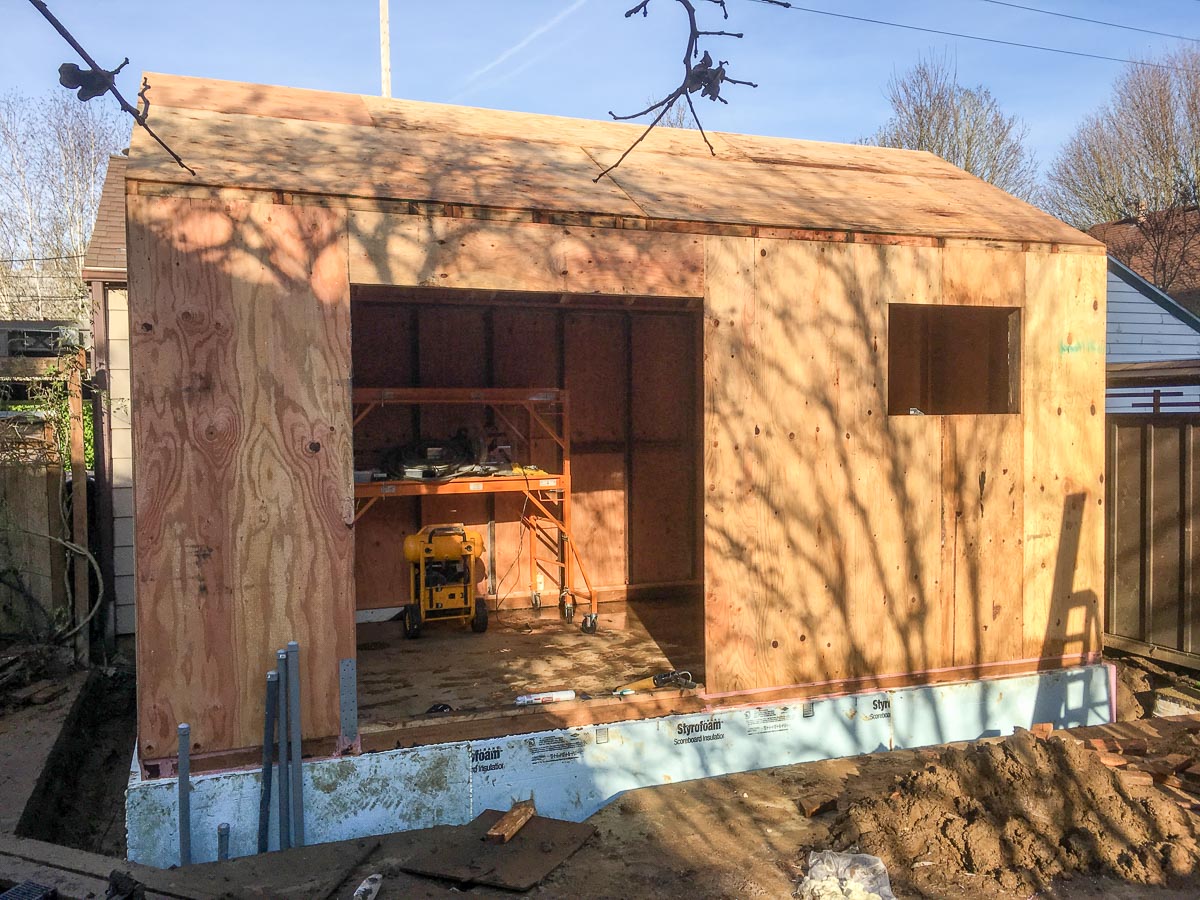
It’s been a productive month. The structure is back on the new slab and the main framing and sheathing is complete.
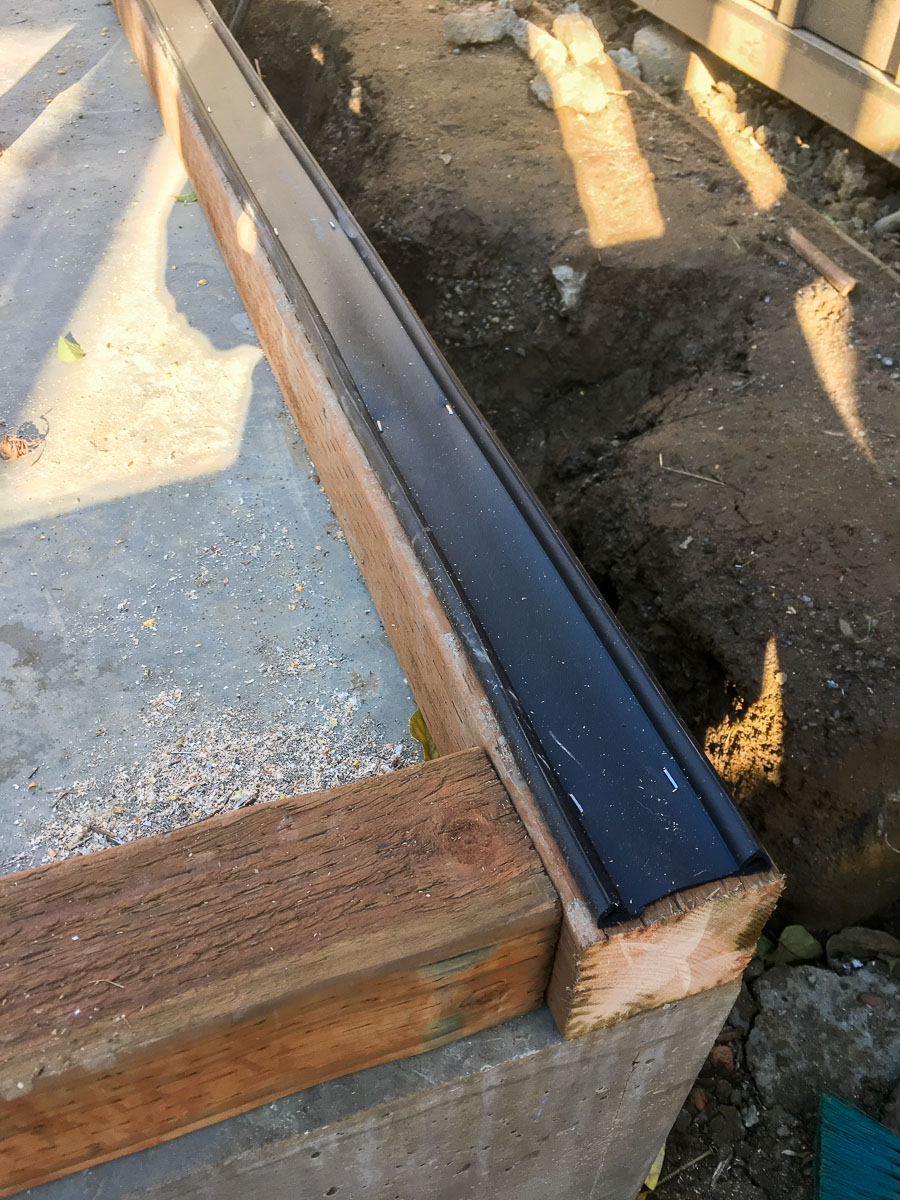
The ADU walls now sit on a new mudsill of pressure-treated 4×4. I’m using a rubber gasket stapled to the bottom of the 4×4 to isolate the wood from the concrete and to also help make the wood-concrete joint air-tight. I ordered the gaskets from Conservation Technologies: http://www.conservationtechnology.com/building_gaskets.html (They are also a good source for Shim Screws for window and door installation.)
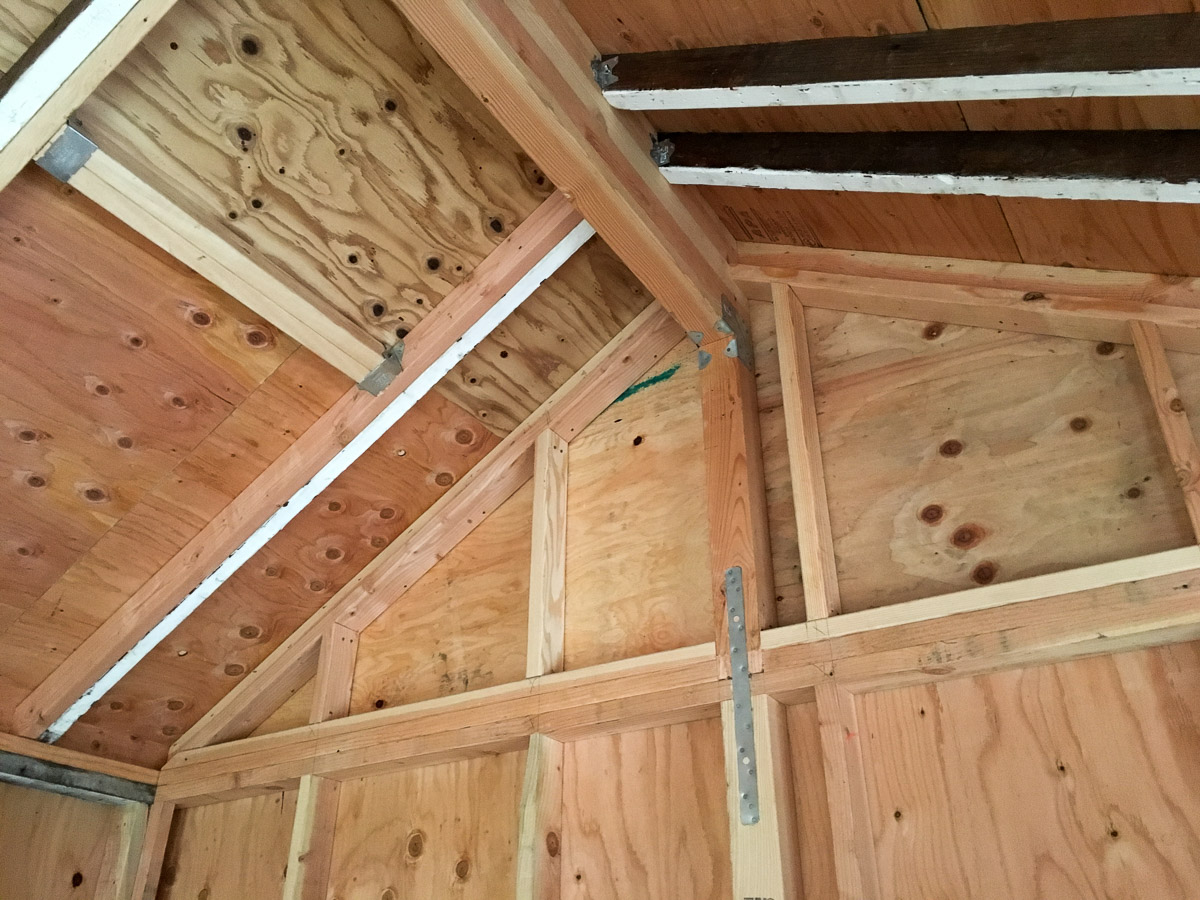
The main changes to the existing Garage framing was the installation of a 4×12 Glulam beam which will become an exposed feature running the length of the ADU. The rafters had to be cut down to fit against the new beam. An extra sillplate was added at the top of the wall as the existing sillplate was looking gnarly.
The architect specified Simpson Strong-Drive SDWC TRUSS Screws to attach the rafters to the sillplates rather than the usual hurricane hold-down ties. It’s as strong as a hold-down connector but faster to install – just drive one screw vs. nailing in 10 nails per connector. The kit that Simpson provides includes the required drive-bit, also a jig for getting the entry point and drive angle correct. The screw head is orange which makes it easy to verify that all rafters have been fastened.
On the north and south facing walls it was possible to retain most of the existing studs however the wood on the east and west walls had to be replaced due to extensive rot in the bottom of the studs.
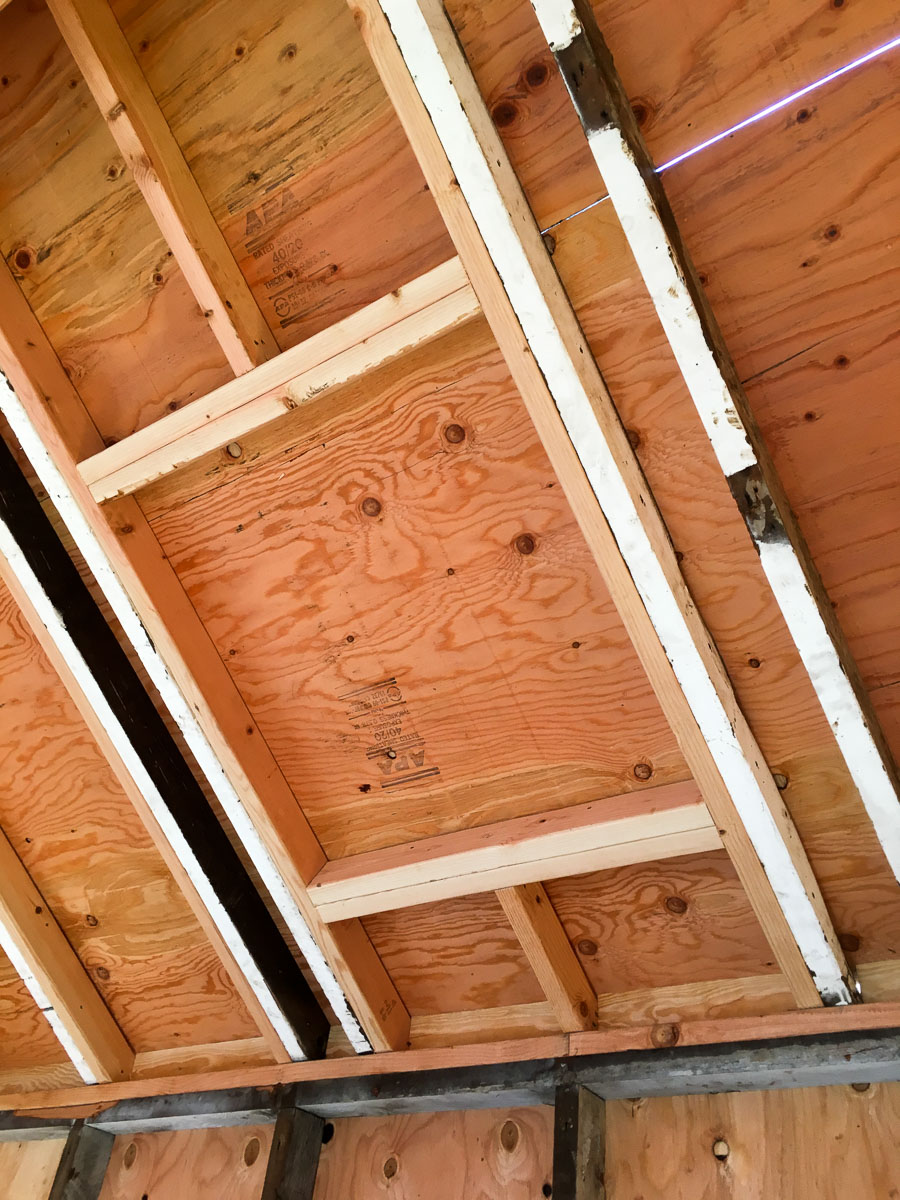
The existing rafters were also retained, however doubled up to provide extra strength. The old wood had a greater tendency to split when driving nails.
The plywood wall sheathing was installed vertically so that all edges fell on studs/sillplates for maximum nailing strength. (Had they been laid horizontally then blocking would have been required between all studs.)
The roof sheathing was laid horizontally to maximize the number of rafters tied together by each sheet.
Panel spacing was around 1/16″ for the walls, and increased to 1/8″ in the roof sheathing where I’m thinking there is greater possibility of thermal expansion/contraction.
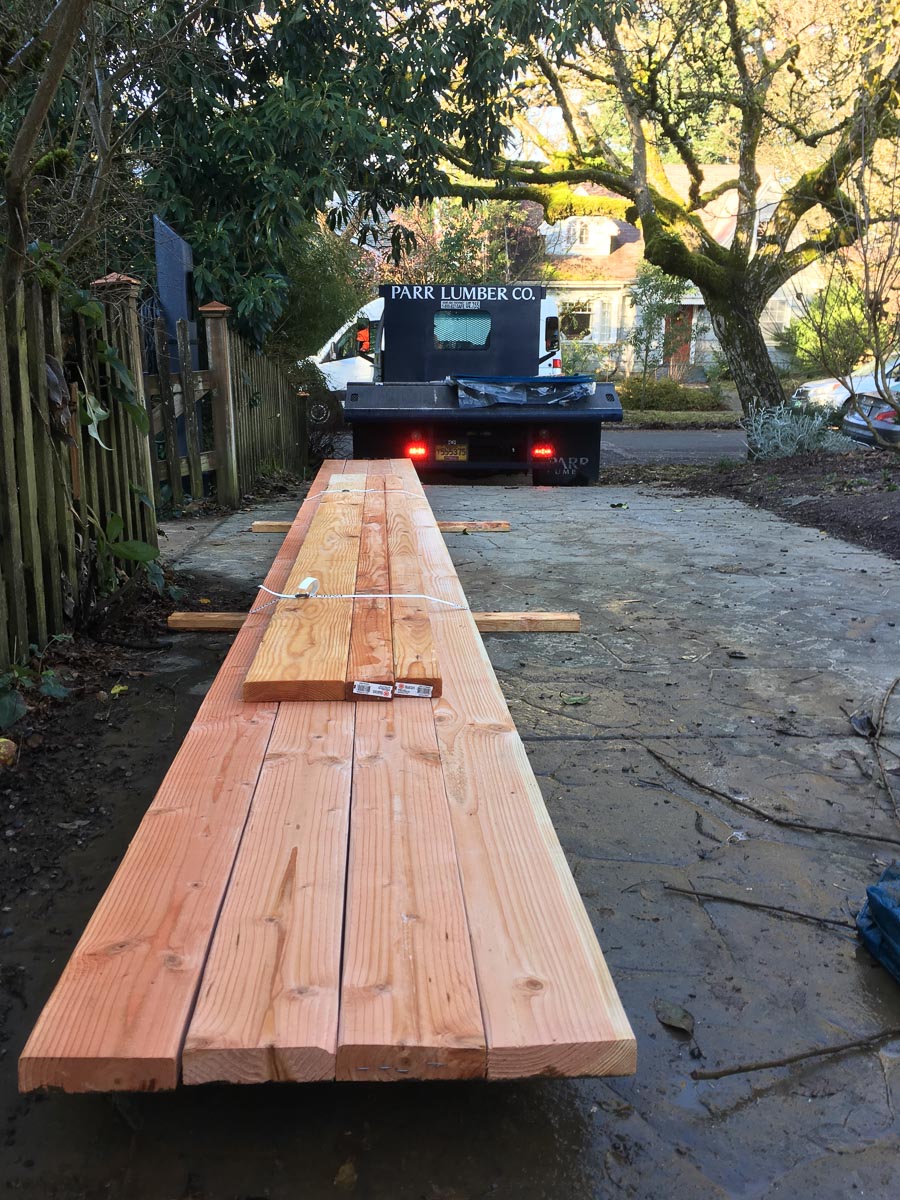
The builder has provided much of the construction lumber. I’ve been using Parr Lumber for some items
This is perhaps the most complex and expense part of the ADU construction. The concrete truck, pump and expertise was arranged by my builder Josh O’Duin.
The concrete truck was the type that customizes the mix on-site, It’s loaded with sand, gravel, cement, water, and additives and the operator selects the mix from a control panel. This reduces the risk of underestimating the quantity needed and eliminates wastage. It also means the builder can request changes to the mixture right up until the pour.
So my mix was 8.45 yards of 4000 PSI mix.
Here’s a video of the pour. It went smoothly although it meant a long day for Josh O’Duin. It was cool (actually great concreting weather) which meant it took a while to setup up enough that he was able to get on knee-boards and smooth the slab.
By the end of the day it was one fine, super-smooth slab of concrete.
The permitting process and interaction with the Portland Bureau of Development Services is in some ways almost as challenging as some of the design and construction issues. As I see it BDS is more oriented towards commercial developers than home owners. I should know the process well by the time my ADU is finished but until then I’m doing everything for the first time. BDS recently setup “Residential Permit Nights” Thursday evenings where you go in to 1900 SW 4th Ave and sort out permits without waiting in line with contractors. It’s an idea, but I don’t think they have entirely the right expertise there to answer much beyond standard requests. The one time I used the service I was given sewer connection advice that was completely wrong. I usually go into BDS daytimes but recently I’ve noticed a trend where instead of sitting me down with a subject matter expert I am given a phone number to call, leave a message, then wait for a callback to discuss. It’s not the same as being able to sit with someone with plans and show them what I’m doing. The real expertise resides in the senior inspectors and I have received invaluable advice in the past from the senior Plumbing Inspector. However I’m finding them increasingly difficult to reach. The other comment I’ll make is that I think the inspectors, for the most part, try to be helpful to home owners. I messed up the inspection codes for the underslab plumbing inspection but the inspector was able to resolve the issue. They might not be nearly as lenient to commercial contractors.
My Permits
The architect applied for the building permit on which I’m listed as the contractor. So it’s my responsibility to request building inspections and track them. The electrical permit is handled entirely by my electrician. I’m not able to do any of this work including run underground conduit without the City putting a 2 year block on ability to rent out the property. The drainline rough-in I am able to do myself without rental restrictions and I pulled my own permit. The actually plumbing work inside the ADU must be done by a plumber so that won’t be my permit issue.
Record of Permits and Inspections
The building permit comes with a blue “Residential Inspection Record Card”. It’s really important to get every inspector to sign off this sheet even for trade permits that contractors have raised.
The first section contains the inspection codes you might need to call before pouring the slab. I called BDS and we worked out that I needed 215-Setbacks, 230-Reinforcing/Concrete, and 227-Grounding Electrode. But then the inspector is a different person with different ideas about what codes are needed plus they can see the actual situation on site. I probably should have filled in the paperwork for 200-erosion control as we were shifting dirt around, although I slipped by that one as it was an existing structure. The inspector commented I was doing a good job on that. He asked to see the paperwork for the survey markers on the property line so he could check the setbacks. I had a survey done 2 years ago before building the back fence however I hadn’t paid the ~$400 to get this formally registered with the city. I was able to get through that by explaining it was an existing structure and I was putting it back (was required to put it back) exactly where the original building had been. (However if you are building a new ADU, then you need to be prepared for the City to insist on formal survey documentation.) He asked about an insulation code – however there was no insulation code listed in the pre-pour section so I’d never requested one. I told him there was a complete insulation system that would be inspected later and he didn’t push that any further. He commented that the builder had done an excellent job on the foundation prep and formwork.
My biggest mistake so far
Then he asked “Where’s your 305-Underslab Plumbing?”. The previous week I’d had the underslab plumping inspected and had a 399-Final signed off on the rough-in permit. What I should have done was also called a second code – a 305 on the Building Permit. So there it was 14 hours before the concrete pour with a half dozen people scheduled (and paid for) to arrive and pour concrete. The builder was like “The concrete is getting poured tomorrow!”. I left a message with the plumbing inspector who had done the inspection 5 days earlier asking him to urgently call back. He did, right at the end of the day. He clearly couldn’t remember the inspection, however told me that if there had been any problem he would have noted it and if anyone gave me any trouble over the codes then have them call him and he would sort it out.
If I had the plumbing inspector sign the blue form when he did the 399-Final on the Plumbing permit then it’s likely he would have noticed I needed a 305. So it’s really important to always get the blue form signed and to ask the inspector if there are any other codes that should have been called.
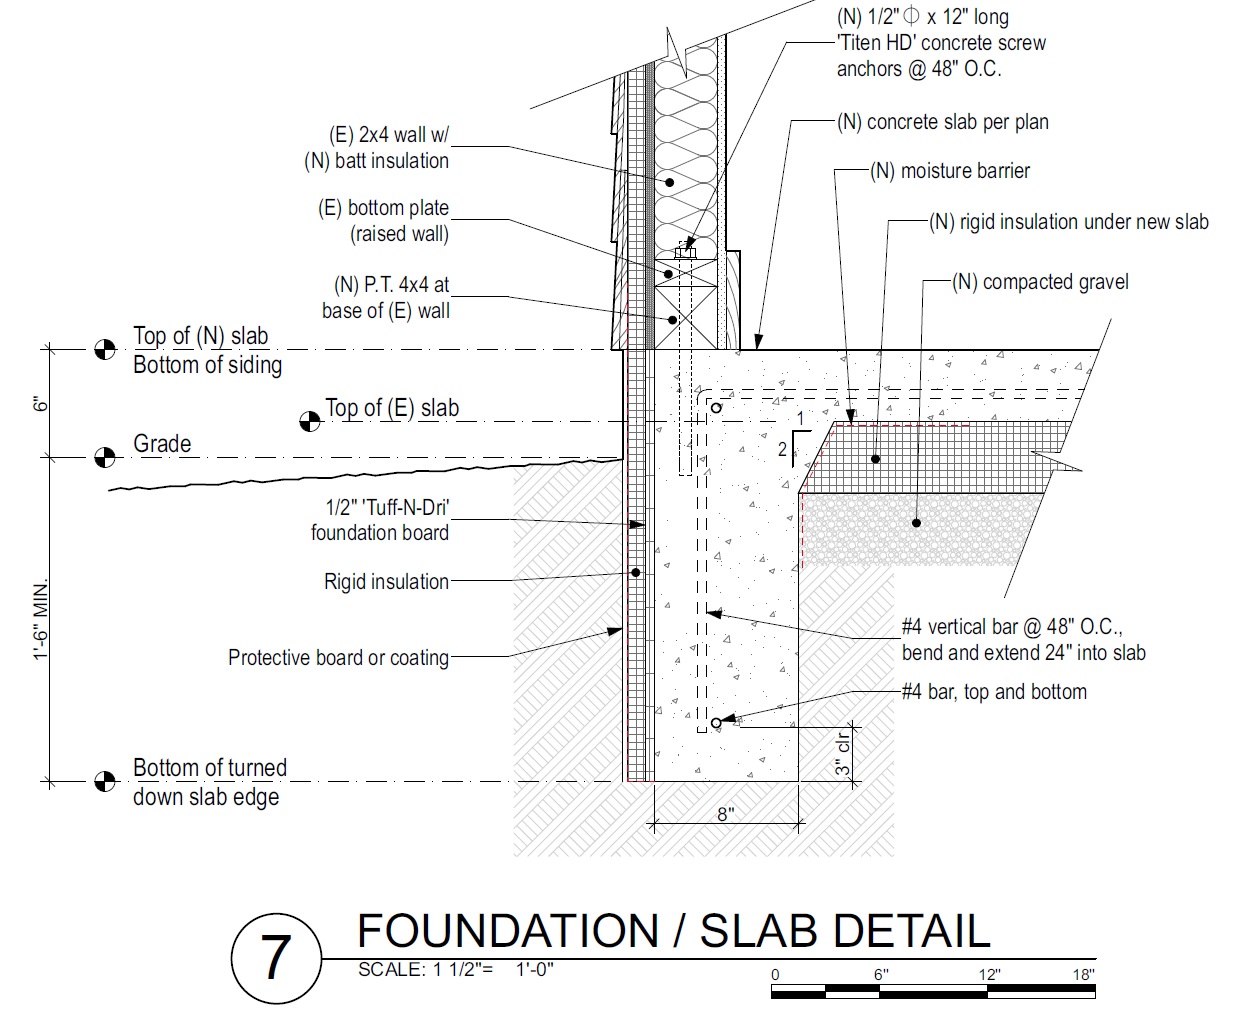
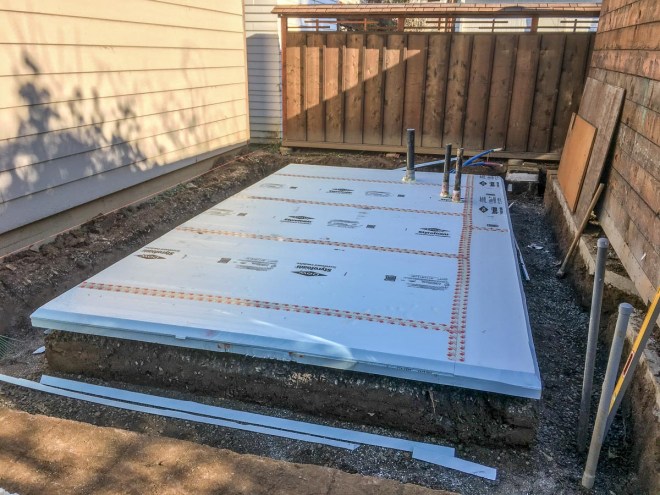
The new slab will be an edge-thickened slab; a 4-inch reinforced concrete slab thickened to 8-inches around the perimeter and extending 1-1/2 feet down, so below Portland’s freeze depth. It will also extend 6-inches above grade putting an end to the water penetration problems. The layers are undisturbed soil, 4-inches compacted gravel, 4-inches XPS foam insulation, a moisture/radon barrier, then concrete.
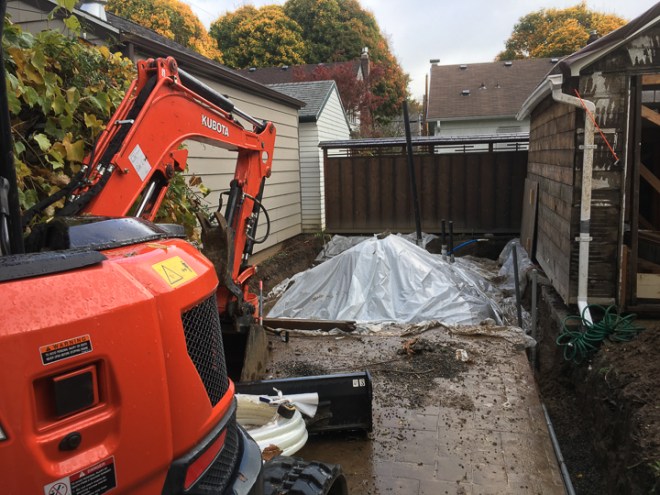
The wet fall weather meant we had to keep the foundation area covered with plastic to prevent the soil getting too saturated. It’s partly a cost issue as you pay for soil disposal by weight. Also mud makes a difficult working environment.
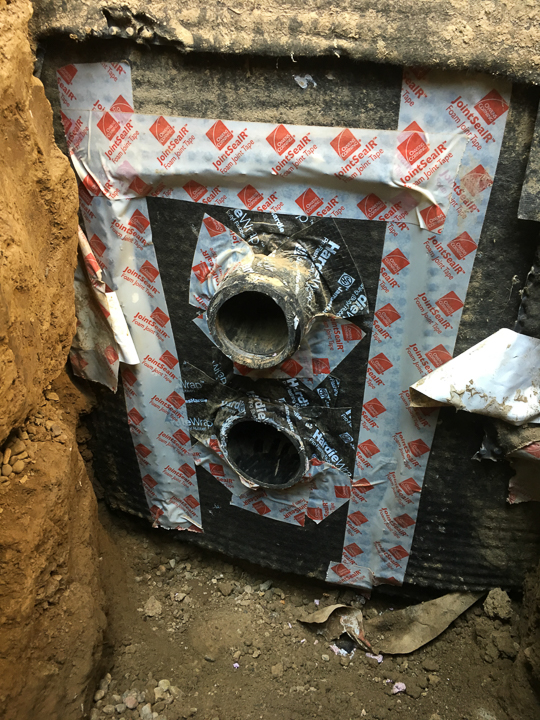
Plumbing protrusions – with protective wrapping
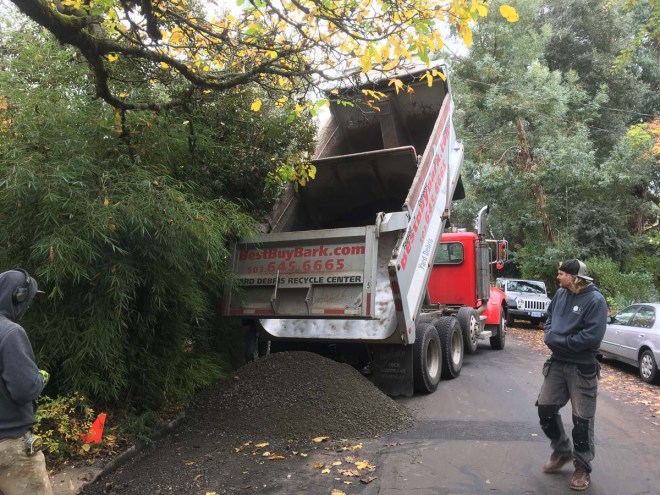
Gravel delivery
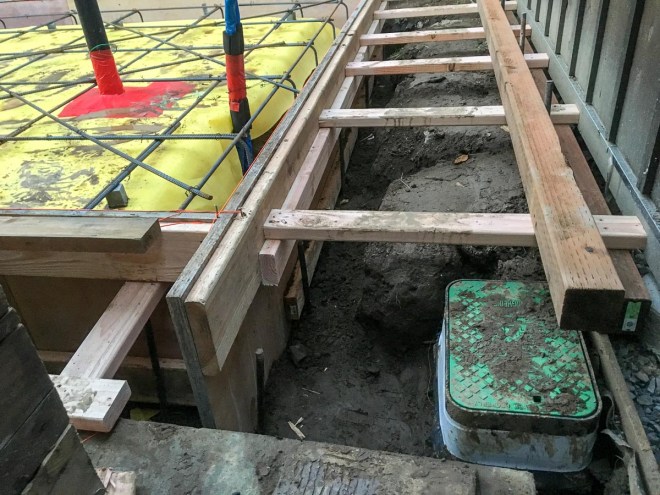
The builder used a mechanical vibrator to compact the gravel and soil. Boards were used to shore up some edges where the plumbing trenches had damaged the soil base. This produce sharp, stable edges that maintained their form all the way through to the foundation pour.
Here’s the compacted soil/gravel base:
Next was 4-inches of XPS insulation in two 2-inch layers alternately oriented to reduce thermal bridging. The seams were taped to help hold the foam in place during the rebar installation and concrete pour.
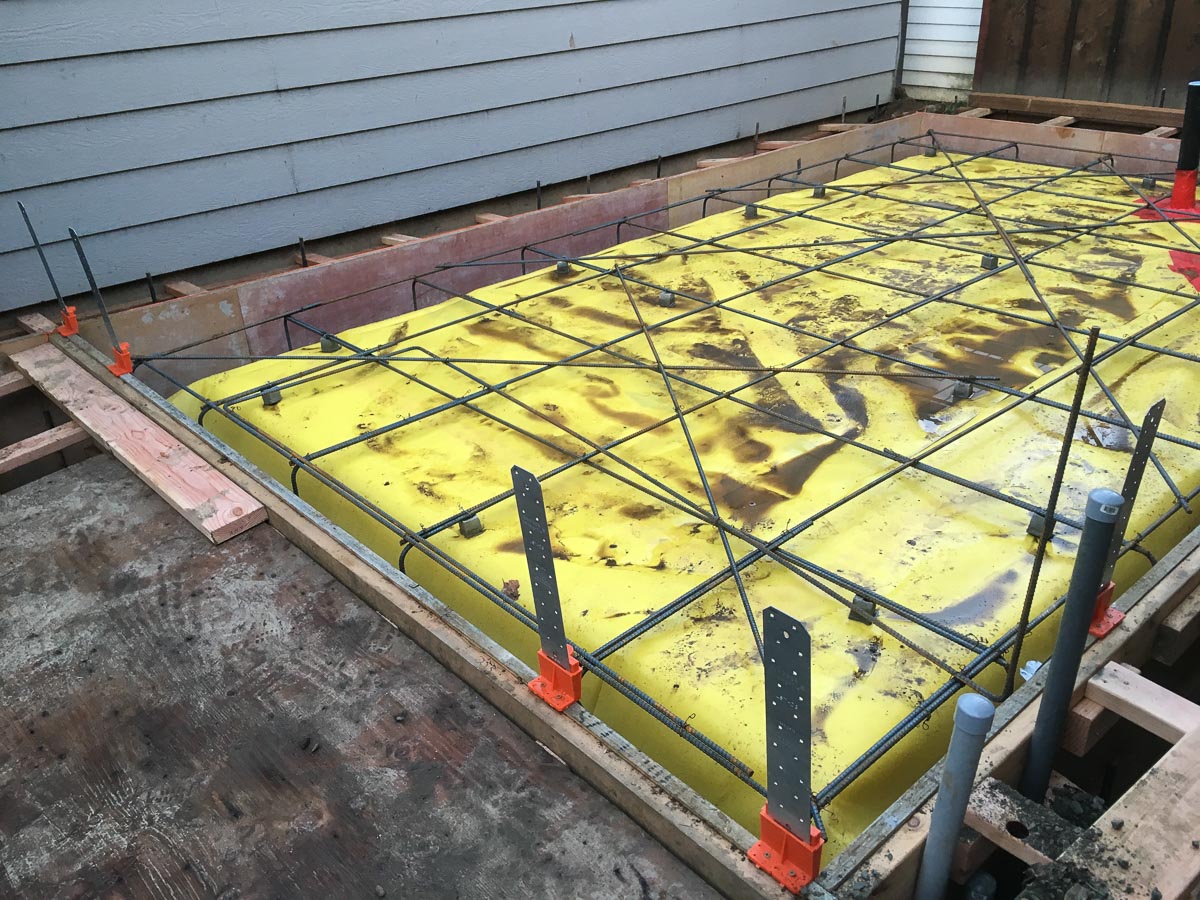
Next was a 15-mil moisture and radon barrier. This came in a massive roll however I will keep the surplus material for when I eventually replace the main house basement floor. The five LSTDH8 hold-down straps were mounted onto the formwork. These will be fastened to double studs so it’s necessary to decide exactly where the door and window framing will be located on these three shear walls at this time. The hold-down straps can’t be later moved.
Next the was the rebar. The builder had the L-shaped rods pre-cut and pre-bent off-site so that no rebar bending was needed at the construction site. He also installed a 20-foot earthing rod (made from rebar). It doesn’t need to be in one long straight length. Instead he had it bent offsite into a compact shape that could be easily transported. It is then tied to the foundation rebar. It will protrude through the mudsill under where the electrical panel will be located.
Here’s a photo of some of the formwork and bracing.
Time to trench for the water, waste, electricity, and Internet connections and get the rough-in inspection approved so the slab work can start.
Approach
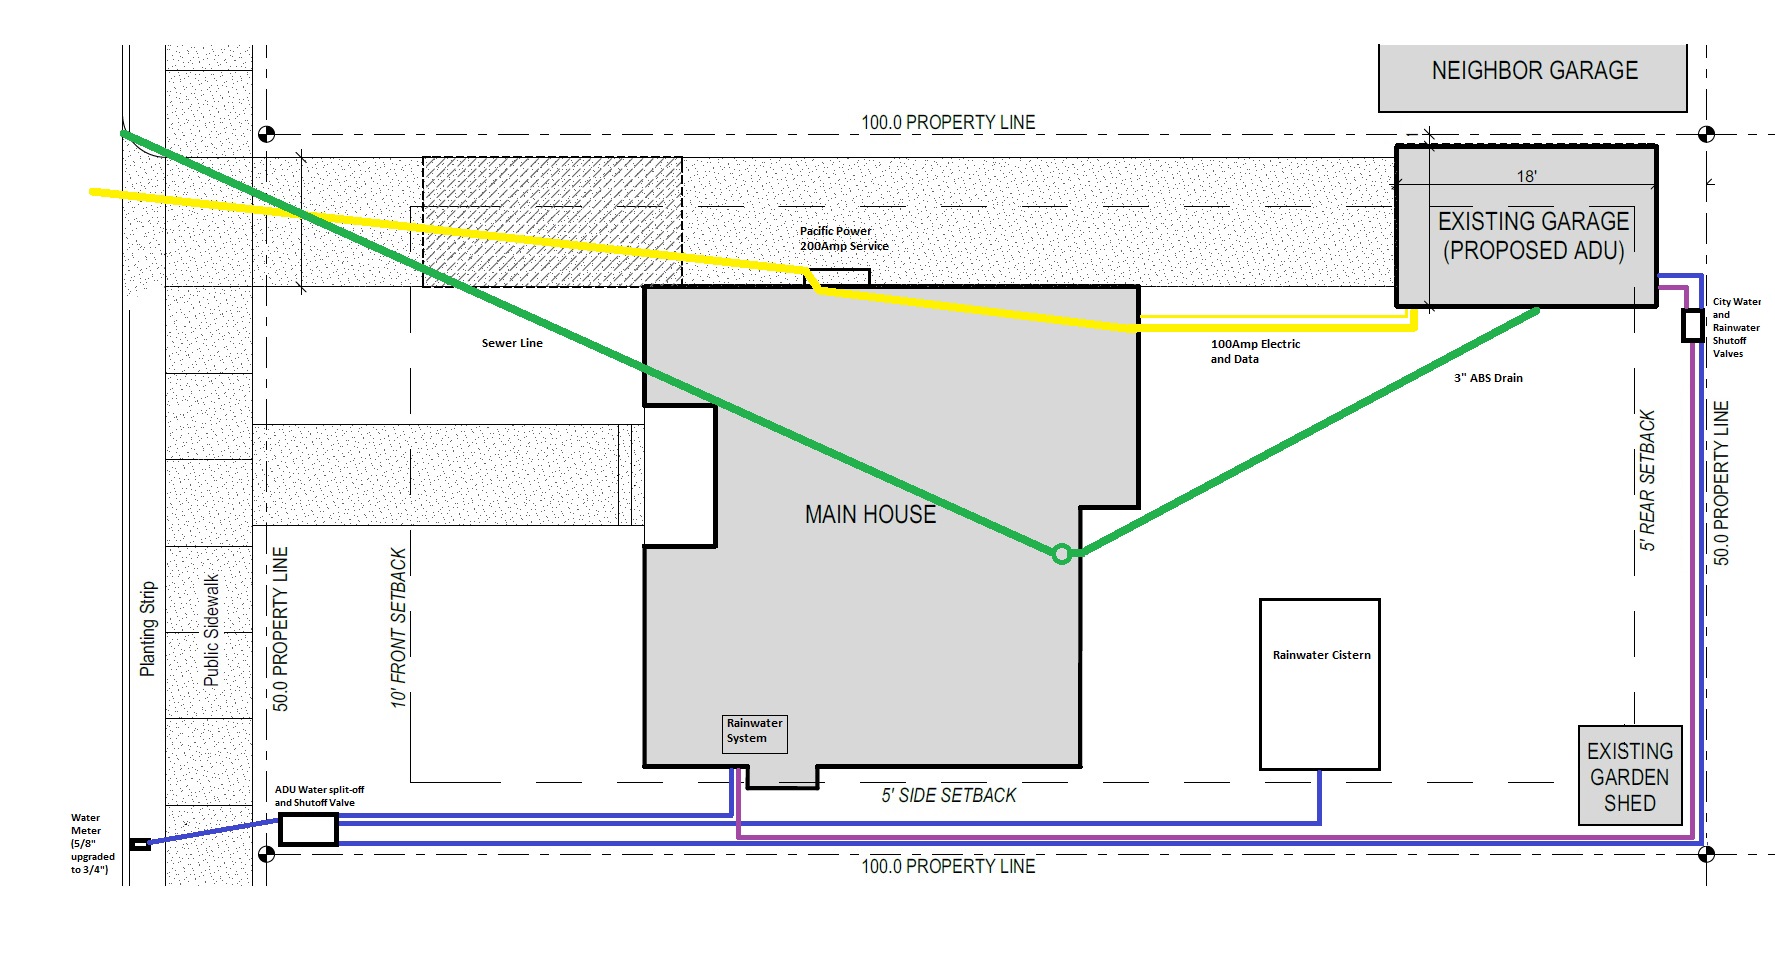
My strategy is to keep the ADU utility services as independent as possible from the main house services.
The original plan was to run a 100Amp electric feed from the main house 200Amp panel; then run a recirculating hot water loop between a hot water heater in the house and the ADU. I came to realize mixing the utility systems between the two building would over-complicate the setup. For example a problem with hot water in ADU would require troubleshooting in both the ADU and the main house. Also my main house electrical panel is close to maxed out, so better to run the ADU feed directly from the Pacific Power distribution box on the outside of the house and to have no contact with the house switchboard at all. The discussions I had with my electrician Randy from ABC Electric were very helpful in setting my thinking straight on this.
Likewise my original plan for Internet was to create a Virtual Private Network off the main house network switch however I’m now thinking separate the systems completely. So run Centurylink Fiber or Comcast cable from the street pole, routing it through the house, and then to the ADU.
Here’s the map for the utility connections:
Utility Plan
Sewer
The only practical approach was to run a 3-inch drain from the ADU, through the house basement wall, and into the house main stack. Running a new drain directly out to the city sewer line in the middle of the street would have been spendy.
I went to a Thursday evening Home Owners’ residential permit night at the Bureau of Development Services to cross-check the sewer line details. The plumbing guy on duty advised me I would need a backflow valve on the sewer line as it entered the house (this made no sense at all and was impossible to do anyway) and then said I couldn’t run the line from the ADU to the house at all. That the code had just changed and I would have to trench from the ADU to the main sewer in the street. This also seemed unlikely as the city streets would be a mess if every ADU being constructed resulted in the street being dug up and a new 6-inch connection being created. In any case the city had already approved my ADU plan which clearly showed the sewer connection running to the house.
Turned out the BDS plumbing guy had no idea what he was talking about although I wasted several days working that out. My advice is to never accept the word of just one BDS staff. If you’re skeptical of what you’re being told, then cross check with a senior inspector.
Main House Stack
Three years ago when digging up my backyard I ran a 3-inch drain through the basement wall to within 10 feet of the ADU in preparation for this project. Two major problems: I had assumed I could grade it at 1/8-in/foot – WRONG – it is treated like any drain internal to the house and must be graded at 1/4-in/foot. Secondly the ADU slab design had changed from being just a 4-inch slab on grade to a slab with thickened edges that go down below the freeze line. So my planned drain was located too high.
So time to drill another hole in the basement wall. This is easy if you have the right tools; takes about 30-minutes. I have a medium-sized Bosch hammer drill that works well for cutting holes through 6-inches of concrete. A regular battery powered drill would not be powerful enough to do this. Bosch RH228VC 1-1/8-Inch SDS-plus Rotary Hammer. It’s an excellent tool.
I drill a bunch of holes in a circle followed by a chisel bit to mark out the circle, then use a metal hammer to knock out any remaining concrete. I epoxied in a 4-inch ABS sleeve (sloped at 1/4-in/foot) and then ran the 3-inch drain line through this sleeve. I’m using sleeves for all my basement wall penetrations now. This should extend the life of the drain as it’s not in direct contact with the concrete basement wall. It will also allow the drainline to flex somewhat during earthquakes and reduce the risk of it breaking.
I sealed the gap between the drain and the sleeve using silicone on the outside and intend to spray-foam from the inside for insulation. [Although having researched sealant more since then, I would now use Prosoco Gap and Crack Sealer – or similar liquid flashing compound – instead of silicone.]
This is what the sleeves look like from the outside of the basement wall. The top sleeve is from the abandoned 3-inch line located too high (it has been repurposed for a 2-inch line for a future hot tub/outdoor kitchen drain line). The bottom sleeve is for the new ADU drain line. I have several waterproofing layers and XPS insulation on the outside of the basement walls so I needed to reseal each layer which took about one day.
I hired a plumber for 2 hours to reconfigure the main plumbing stack in the house.
The top connection is the 2-inch line for the future hot tub and outdoor kitchen drain. The next one down is the new 3-inch drain from the ADU. The bottom connection is the main house upper-floor bathroom drain.
There are Ferncos of varying quality that could be used for the coupling between ABS and cast iron. The standard Ferncos in Home Depot/Lowes are a lower-quality product. If you’re willing to spend a little bit more ($18/fernco) then Ferguson stocks the higher quality connectors that should result in a much longer life and with less risk of leaks. I used the HD-33 and HD-44 “green” couplings. Fernco No Hub Couplings
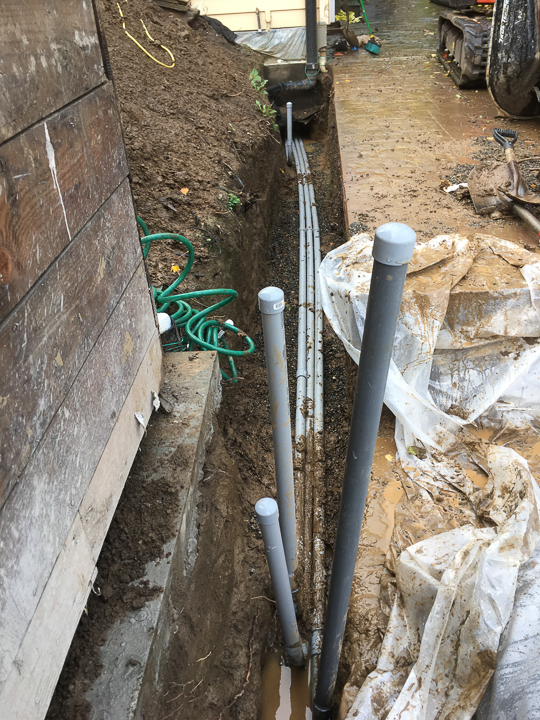
Drain Line and Testing
It was a 50-foot run from the house to the ADU. I used a laser level to get the trench slope about right. My builder provided a plumber for a day who assembled the ABS, and finalized the slope using a bubble gauge. Note:
It’s required to run a green tracer wire the length of the drain. Cable-tie it to the ABS at regular intervals.
The pipe needs to have a protective wrap (e.g. foam wrap) around it where it will protrude through the ADU slab.
There needs to be a cleanout installed just before the house basement wall. It functions not only as a cleanout but is also used to test the drain integrity during the city inspection. Extend the ABS vertically 10-feet above the ADU slab. A test balloon is inflated in the cleanout to block the drain and the 10-ft pipe is filled with water to pressure test the drain. The city inspectors will be looking for this.
Power
I ran 1-1/4-inch conduit underneath the basement stem wall (the wall is only 3 feet deep at this part of the house) to the ADU. I ran three conduits – 100-Amp feed, Data lines, and a 3rd for future potential use for solar power.
My original idea was to run the conduit up through the ADU slab and the mudsill into a stud bay in the ADU. However after discussion with the builder we agreed to run the conduit up the outside of the wall and into the ADU using LBs through the siding. The main reason: the mudsill is only 4-inch wide and the 1-1/4-inch conduit would have weakened the sill and the foundation too much. Also too much risk of concrete spalling.
Water Supply
Four years ago I had trenched and run a 150 foot 1-inch PEX line from the front of the property to the ADU in preparation for this ADU project. It’s possible to get the trench and line depth pre-inspected by the city by requesting a permit for running a “dry line”. Four years later I dug down, located the buried PEX, and connected up the last 10 feet to the ADU.
I had also run a purple PEX line – also 1-inch – in the same trench for rainwater supply to the ADU. This dry line was also inspected and permitted at the time so there was a record of the line when it came time to build the ADU.
Portland City Water Connection
The photo above shows the ADU PEX line connected to the city water supply. This valve box is located on my property 2-feet from the sidewalk where the water supply enters the property. It’s deep! Around 3 feet down so quite the dig. I don’t think it’s a good idea to feed the ADU from the water supply in the main house. The ADU demand would be combined with the house water demand and there’s a risk that the 3/4″ supply pipe from the street to the house could limit supply and reduce pressure. Also if you shutoff the water supply to the house for some reason, now you’ve lost ADU water supply as well. Instead I think it’s better to split off the ADU water supply as close to where the water supply enters the property. That way the house and ADU only share a short segment of pipe. [At the time I was advised that the junction had to be located within my property; I was not allowed to make any changes in the parking strip where the meter was located.]
The left-hand white PEX is the ADU supply. I installed a valve here so the line can be controlled without shutting off water supply to the whole property at the meter box in the parking strip. Note the blue tracer wire: this runs 150-feet to the ADU. The city plumbing inspector will be expecting to see this. The right-hand backflow valve supplies city water to top-up the underground rainwater cistern over Portland’s long dry summers. The main house supply pipe (copper) is located 6-inches below these other two feeds. I also ran 1-inch PEX from this valve box, under the sidewalk, to the meter box in the parking strip. This would allow me to separately meter the ADU water supply at some point in the future without any further digging. You can see that line in the photo upper-right.
ADU Water Shutoff Valves
Water Shutoff Valves for City and Rain water located within 5ft of the ADU
There needs to be a water shutoff valve located either within 5-feet of the ADU or in an accessible location within the ADU. As space is very constrained in the ADU I put the shutoff valves in a utility box at the back of the structure.
Portland City Water Meter
The City Water Department automatically upgraded my water meter located at the curb from 5/8″ to 3/4″ supply. They did this within a few weeks of the ADU permit being issued. There would normally be a hefty system fee for this upgrade however it’s waived for the moment to encourage new ADU development.,
The existing garage slab was in poor condition: cracked, uneven, and built below grade which resulted in continual water penetration through the mudsill. There was dry rot through much of the mullsill and some studs. I needed to pour a new slab.
One option was to pour a new slab on top of the old although this was not a good foundation for a structure built to the latest building standards and intended to last decades.
So my architect sought and got approval from the City/Irvington Historic Committee to lift or move the garage, demolish the old slab, and pour a new one. Demolishing and rebuilding was not possible as the garage was listed as a historic contributing structure. Instead the building needed to be moved intact, the new slab poured, and the building shifted back onto the new slab.
Getting ready for the move
I stripped back the structure to make it as light as possible for moving, while also removing anything that would not be a part of the final structure.
I purchased a two level scaffold from Home Depot for the roof work: 2-Story Rolling Scaffold Tower. I’ll make good use of this during construction and also when I eventually re-roof the main house.
I also bought some 8×8 beams and 12×2 and 10×2 ledger boards from the Re-Building Center for jacking up the garage.
The Builder: Josh O’Duin
I wasn’t hopeful of finding a builder to take on this project given the building boom in Portland. Instead I expected to work through the garage move and slab work myself.
My architect had suggested JRA Construction however they were too busy to schedule my project. However they referred me to Josh O’Duin who was interested and I signed a contract for construction through to the framing/sheathing stage.
I got lucky there as I would have struggled with the move and slab work. Josh came up with the idea of shifting the garage sideways onto an adjacent concrete pad instead of jacking it up and then having to work underneath the structure.
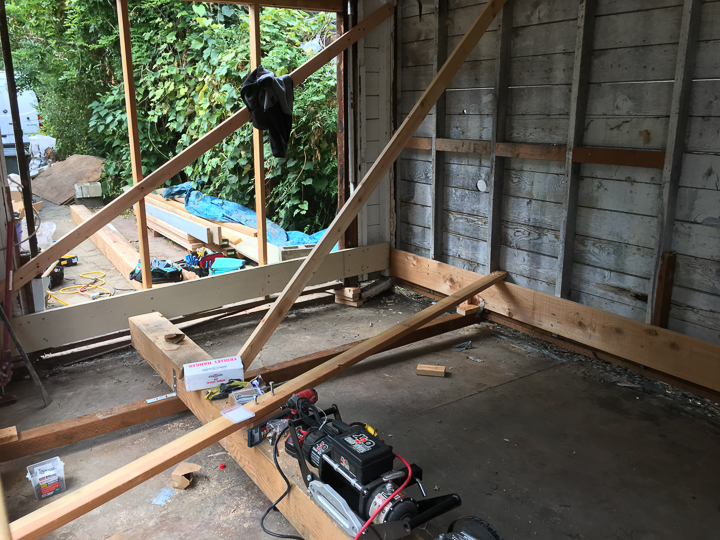
The Move
Josh and his co-worker Tanner spent a couple of days bracing the structure: 12×2 ledgers along the long walls and 10×2 ledgers on the short walls bolted into each stud. Then lots of 2x4s to further brace the walls.
4×4 runners were bolted across the structure to act as runners when rolling the structure.
The move only took 26 minutes. It rolled well on the 1″ cast iron pins placed under the beams and using a cherry tree as a winch point.
It was now ready for the sewer, water, electric trenching and rough-ins and slab work.
I’m familiar with living in small spaces from Hong Kong. My 550 sq ft apartment, although compact, had 2 bedrooms, combined living/dining room, a galley kitchen, and bathroom. The finish quality was high as the small area means it cost relatively little to use higher quality materials.
Here’s my former Hong Kong apartment:
Living Room
Entrance/Dining Room
Study
Hallway to Bedroom
Bedroom
Bedroom
Kitchen
Design Criteria
However a 200 sq ft garage is much smaller so I would have to come up with new ideas to fit in all the usual amenities: bathroom, cooktop, fridge, dishwasher, washing machine and so on.
One design requirement was no Murphy Bed: too much strapping and unstrapping the bedding, moving pillows, when stowing/unstowing.
I also wanted the ADU to be energy-efficient, so well insulated and air-tight, electric only/ no natural gas, and use rainwater for toilet flushing and laundry (I will discuss my rainwater system in another post), also solar roof and backup power.
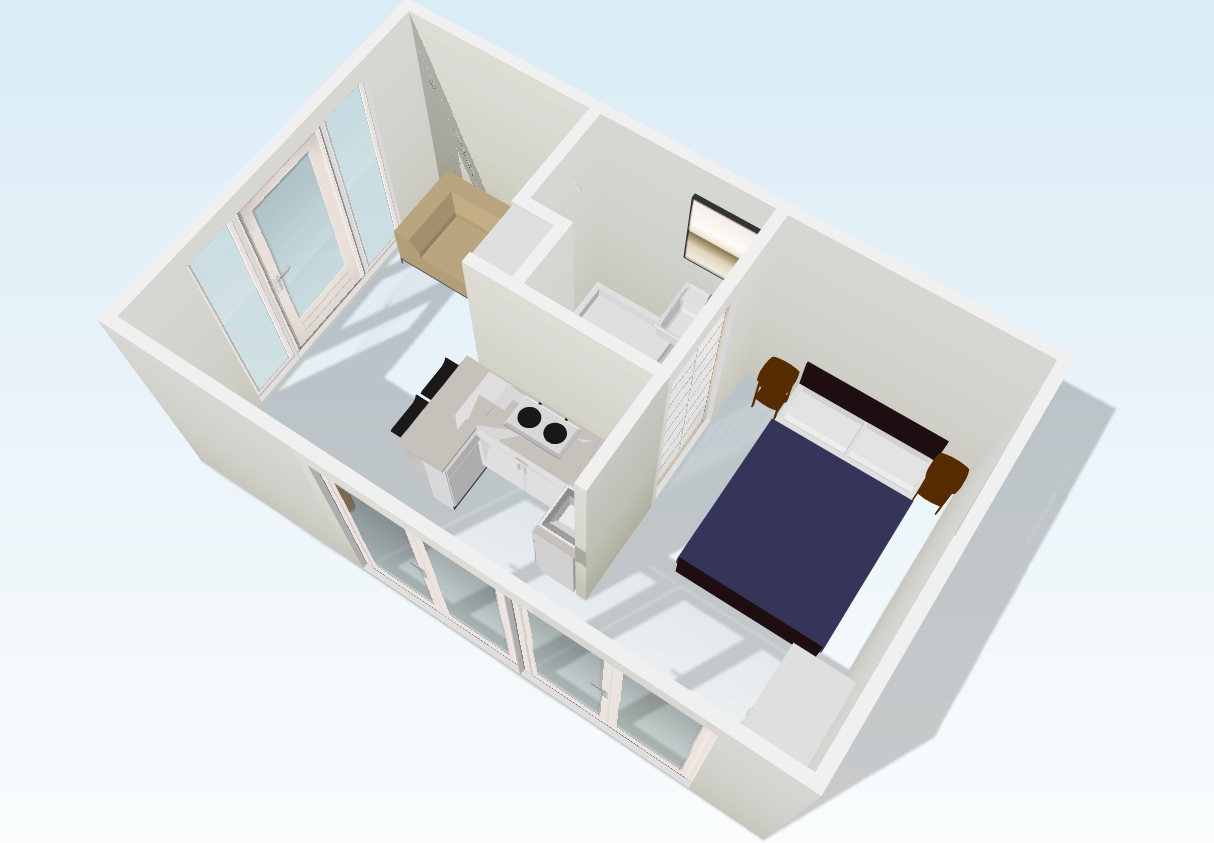
First Design Attempt
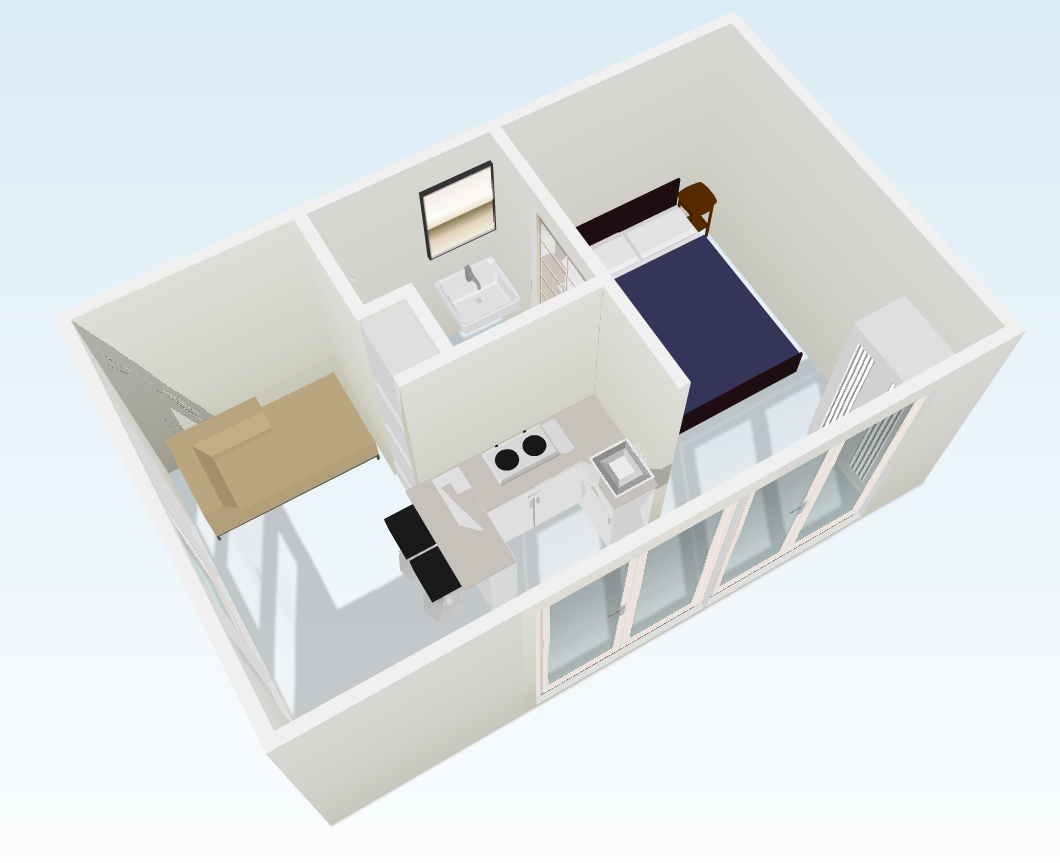
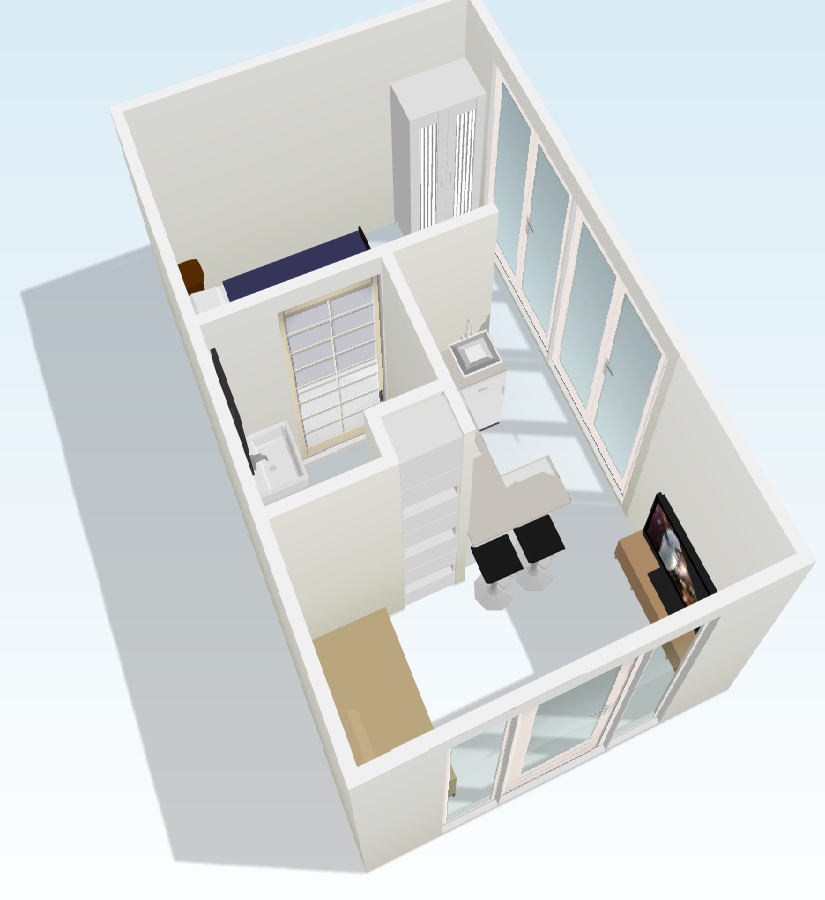
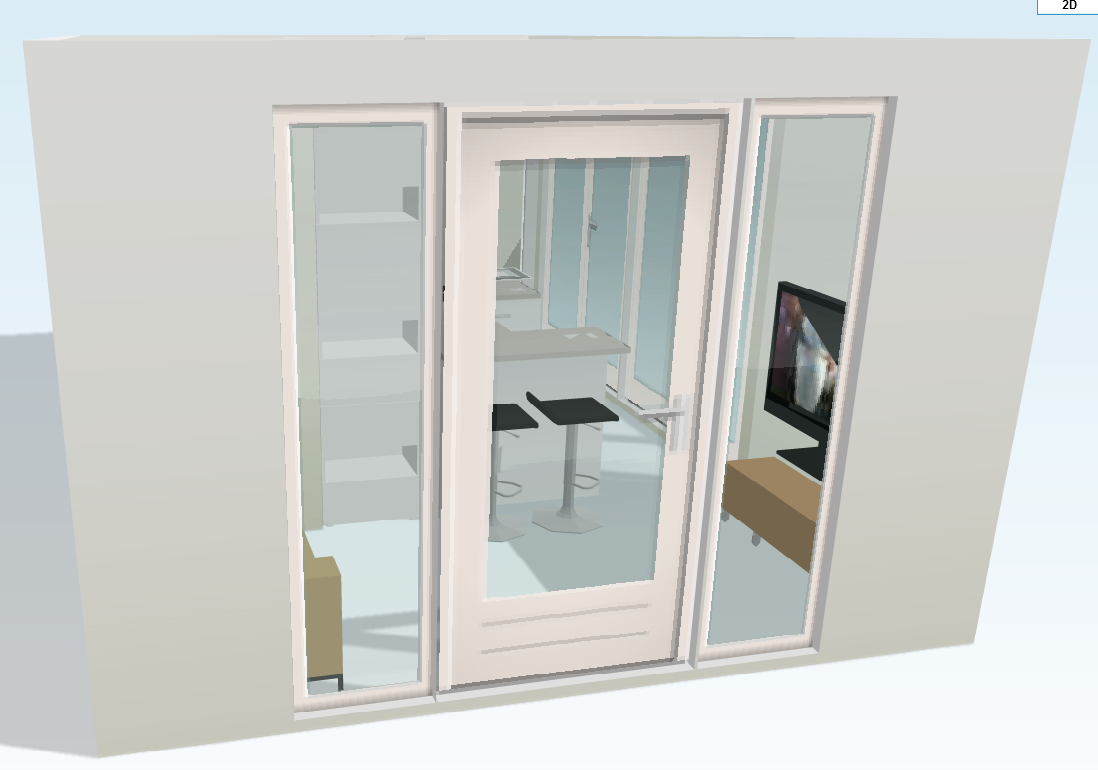
My first design attempt was separate rooms – living, kitchen, bedroom, bathroom – squashed into the 200 sq ft area. I used the floorplanner.com free online tool to create these plans.
There were some limitations with this design: no way to fit a Queen bed, it would be Double at most. Also it was doubtful the clearances in the bathroom would meet city code. (For example there must be 1’3″ clearance on each side of the center line of the toilet.)
Jack Barnes: Architect
I had met Jack on an ADU open home tour the previous year so got in touch and he agreed to come up with a design and to work through the city approvals. As I’m in a historic district there were complications around modifying a historic contributing structure.
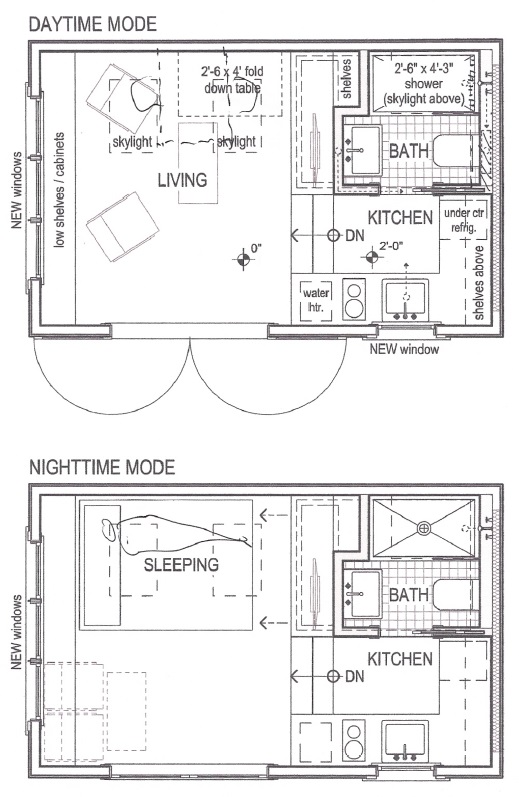
His breakthrough idea was to locate the kitchen and bathroom on a 2 ft high platform with 3 steps leading up from the living area to the kitchen. The queen-sized bed would stow away under the platform creating a living space during the day, converting to a bedroom at night.
My 1929 house, located in the Irvington Historic District in Portland, came with a small 18×11 ft. garage. It was no longer used as a garage and had been converted into a garden studio by a previous owner.
The Garage
Interior as a garden studio
Shingled roof
Garage in relation to the main house
There were structural issues: the concrete slab was cracked, it was below grade and there was continual water infiltration resulting in dry rot in the mudsill and studs. The bump-out at the back of the garage, which had been added to provide storage cabinets, was open at the bottom resulting in a rat and invasive bamboo infiltration.
The garage, while nicely decorated, was going into rapid decline and it had little utility having no plumbing and only a rudimentary electrical feed.
The City wants more ADUs
Portland is facing a housing shortage and the city is waiving System Development Fees for ADU construction. This runs to typically around $15,000 for an ADU. This fee covers additional city public infrastructure for the increasing city population – parks, bike paths, water supply and so on.
I attended a weekend workshop, toured some Portland ADUs, and decided to convert my garage into an ADU.