
Time to trench for the water, waste, electricity, and Internet connections and get the rough-in inspection approved so the slab work can start.
Approach
My strategy is to keep the ADU utility services as independent as possible from the main house services.
The original plan was to run a 100Amp electric feed from the main house 200Amp panel; then run a recirculating hot water loop between a hot water heater in the house and the ADU. I came to realize mixing the utility systems between the two building would over-complicate the setup. For example a problem with hot water in ADU would require troubleshooting in both the ADU and the main house. Also my main house electrical panel is close to maxed out, so better to run the ADU feed directly from the Pacific Power distribution box on the outside of the house and to have no contact with the house switchboard at all. The discussions I had with my electrician Randy from ABC Electric were very helpful in setting my thinking straight on this.
Likewise my original plan for Internet was to create a Virtual Private Network off the main house network switch however I’m now thinking separate the systems completely. So run Centurylink Fiber or Comcast cable from the street pole, routing it through the house, and then to the ADU.
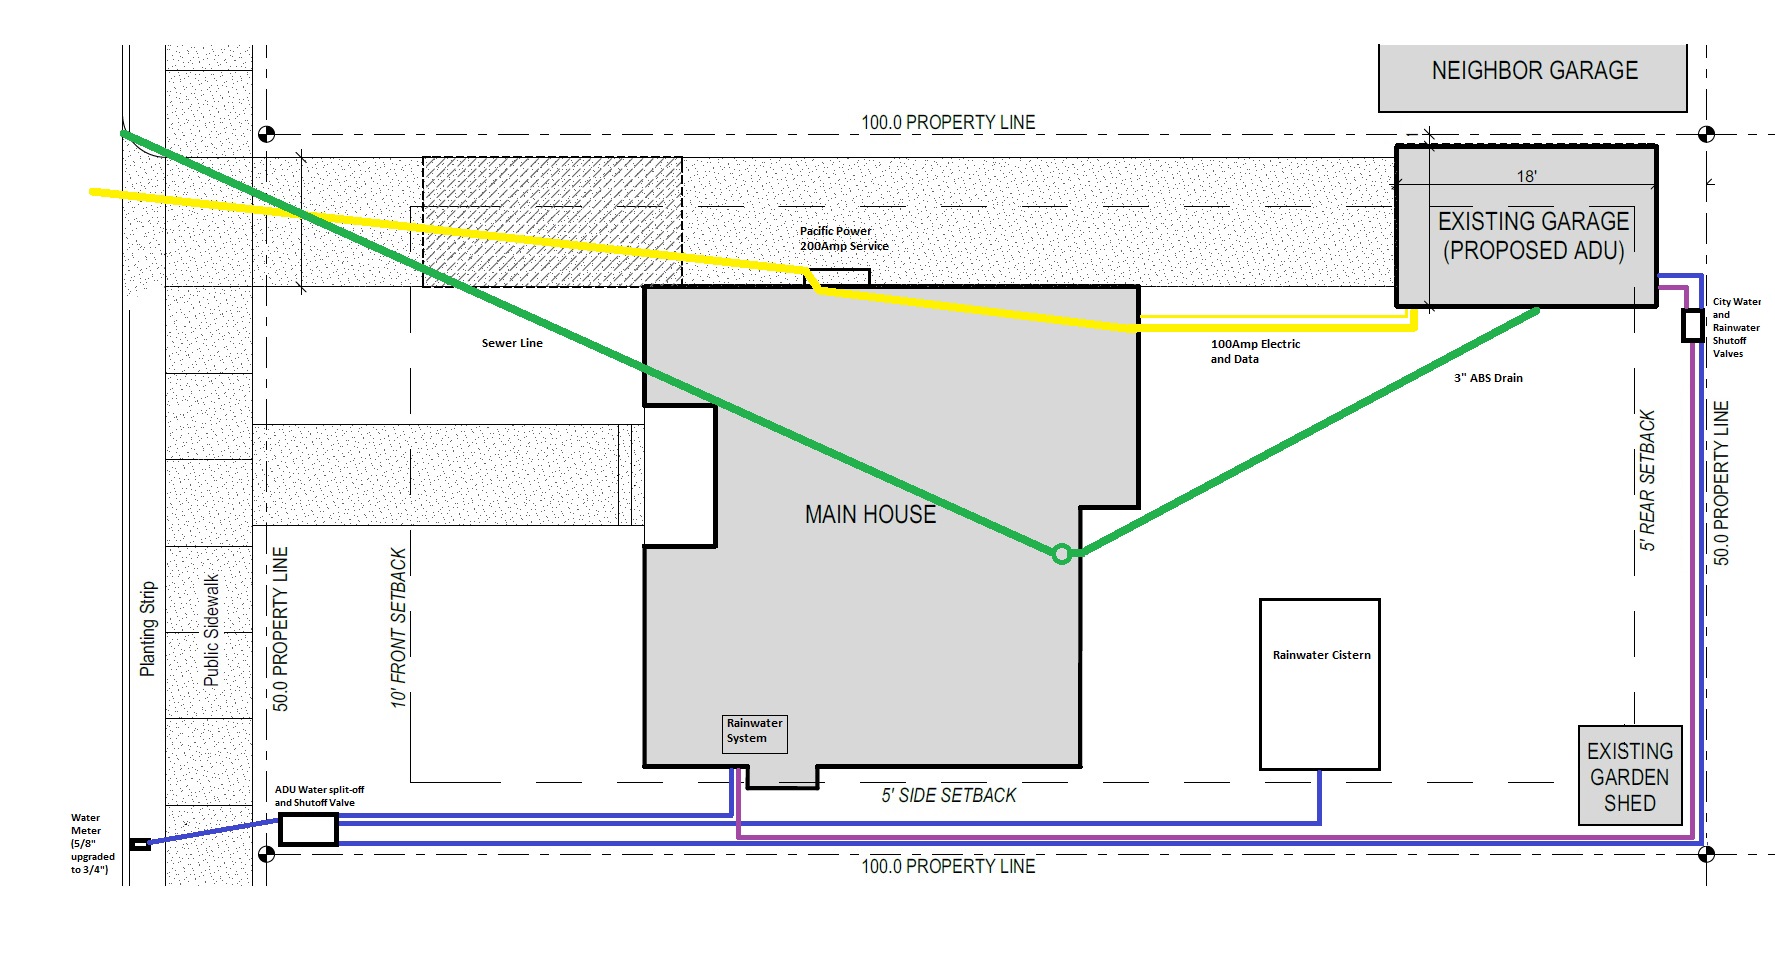
Here’s the map for the utility connections:
Sewer
The only practical approach was to run a 3-inch drain from the ADU, through the house basement wall, and into the house main stack. Running a new drain directly out to the city sewer line in the middle of the street would have been spendy.
I went to a Thursday evening Home Owners’ residential permit night at the Bureau of Development Services to cross-check the sewer line details. The plumbing guy on duty advised me I would need a backflow valve on the sewer line as it entered the house (this made no sense at all and was impossible to do anyway) and then said I couldn’t run the line from the ADU to the house at all. That the code had just changed and I would have to trench from the ADU to the main sewer in the street. This also seemed unlikely as the city streets would be a mess if every ADU being constructed resulted in the street being dug up and a new 6-inch connection being created. In any case the city had already approved my ADU plan which clearly showed the sewer connection running to the house.
Turned out the BDS plumbing guy had no idea what he was talking about although I wasted several days working that out. My advice is to never accept the word of just one BDS staff. If you’re skeptical of what you’re being told, then cross check with a senior inspector.
Main House Stack
Three years ago when digging up my backyard I ran a 3-inch drain through the basement wall to within 10 feet of the ADU in preparation for this project. Two major problems: I had assumed I could grade it at 1/8-in/foot – WRONG – it is treated like any drain internal to the house and must be graded at 1/4-in/foot. Secondly the ADU slab design had changed from being just a 4-inch slab on grade to a slab with thickened edges that go down below the freeze line. So my planned drain was located too high.
So time to drill another hole in the basement wall. This is easy if you have the right tools; takes about 30-minutes. I have a medium-sized Bosch hammer drill that works well for cutting holes through 6-inches of concrete. A regular battery powered drill would not be powerful enough to do this. Bosch RH228VC 1-1/8-Inch SDS-plus Rotary Hammer. It’s an excellent tool.


I drill a bunch of holes in a circle followed by a chisel bit to mark out the circle, then use a metal hammer to knock out any remaining concrete. I epoxied in a 4-inch ABS sleeve (sloped at 1/4-in/foot) and then ran the 3-inch drain line through this sleeve. I’m using sleeves for all my basement wall penetrations now. This should extend the life of the drain as it’s not in direct contact with the concrete basement wall. It will also allow the drainline to flex somewhat during earthquakes and reduce the risk of it breaking.
I sealed the gap between the drain and the sleeve using silicone on the outside and intend to spray-foam from the inside for insulation. [Although having researched sealant more since then, I would now use Prosoco Gap and Crack Sealer – or similar liquid flashing compound – instead of silicone.]
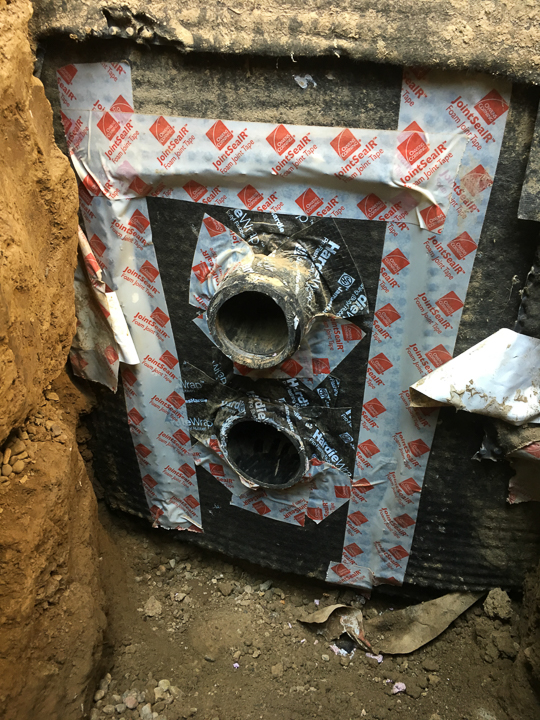
This is what the sleeves look like from the outside of the basement wall. The top sleeve is from the abandoned 3-inch line located too high (it has been repurposed for a 2-inch line for a future hot tub/outdoor kitchen drain line). The bottom sleeve is for the new ADU drain line. I have several waterproofing layers and XPS insulation on the outside of the basement walls so I needed to reseal each layer which took about one day.
I hired a plumber for 2 hours to reconfigure the main plumbing stack in the house.


The top connection is the 2-inch line for the future hot tub and outdoor kitchen drain. The next one down is the new 3-inch drain from the ADU. The bottom connection is the main house upper-floor bathroom drain.
There are Ferncos of varying quality that could be used for the coupling between ABS and cast iron. The standard Ferncos in Home Depot/Lowes are a lower-quality product. If you’re willing to spend a little bit more ($18/fernco) then Ferguson stocks the higher quality connectors that should result in a much longer life and with less risk of leaks. I used the HD-33 and HD-44 “green” couplings. Fernco No Hub Couplings
Drain Line and Testing
It was a 50-foot run from the house to the ADU. I used a laser level to get the trench slope about right. My builder provided a plumber for a day who assembled the ABS, and finalized the slope using a bubble gauge. Note:
- It’s required to run a green tracer wire the length of the drain. Cable-tie it to the ABS at regular intervals.
- The pipe needs to have a protective wrap (e.g. foam wrap) around it where it will protrude through the ADU slab.
- There needs to be a cleanout installed just before the house basement wall. It functions not only as a cleanout but is also used to test the drain integrity during the city inspection. Extend the ABS vertically 10-feet above the ADU slab. A test balloon is inflated in the cleanout to block the drain and the 10-ft pipe is filled with water to pressure test the drain. The city inspectors will be looking for this.


Power
I ran 1-1/4-inch conduit underneath the basement stem wall (the wall is only 3 feet deep at this part of the house) to the ADU. I ran three conduits – 100-Amp feed, Data lines, and a 3rd for future potential use for solar power.
My original idea was to run the conduit up through the ADU slab and the mudsill into a stud bay in the ADU. However after discussion with the builder we agreed to run the conduit up the outside of the wall and into the ADU using LBs through the siding. The main reason: the mudsill is only 4-inch wide and the 1-1/4-inch conduit would have weakened the sill and the foundation too much. Also too much risk of concrete spalling.
Water Supply
Four years ago I had trenched and run a 150 foot 1-inch PEX line from the front of the property to the ADU in preparation for this ADU project. It’s possible to get the trench and line depth pre-inspected by the city by requesting a permit for running a “dry line”. Four years later I dug down, located the buried PEX, and connected up the last 10 feet to the ADU.
I had also run a purple PEX line – also 1-inch – in the same trench for rainwater supply to the ADU. This dry line was also inspected and permitted at the time so there was a record of the line when it came time to build the ADU.

The photo above shows the ADU PEX line connected to the city water supply. This valve box is located on my property 2-feet from the sidewalk where the water supply enters the property. It’s deep! Around 3 feet down so quite the dig.
I don’t think it’s a good idea to feed the ADU from the water supply in the main house. The ADU demand would be combined with the house water demand and there’s a risk that the 3/4″ supply pipe from the street to the house could limit supply and reduce pressure. Also if you shutoff the water supply to the house for some reason, now you’ve lost ADU water supply as well.
Instead I think it’s better to split off the ADU water supply as close to where the water supply enters the property. That way the house and ADU only share a short segment of pipe. [At the time I was advised that the junction had to be located within my property; I was not allowed to make any changes in the parking strip where the meter was located.]
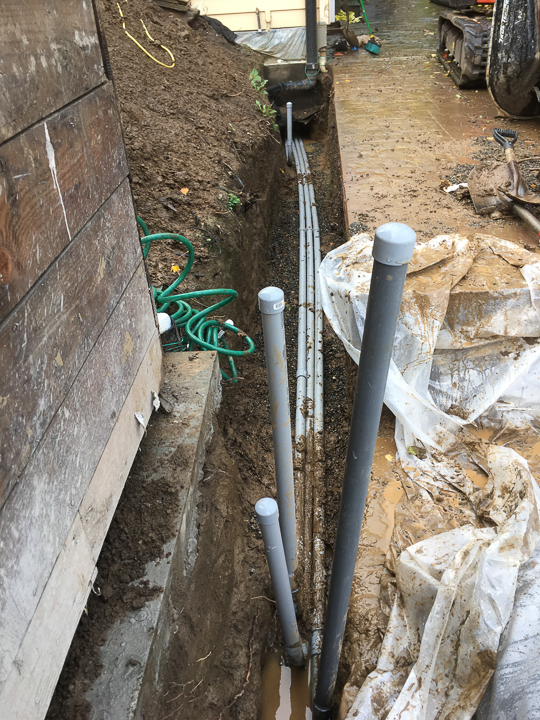
The left-hand white PEX is the ADU supply. I installed a valve here so the line can be controlled without shutting off water supply to the whole property at the meter box in the parking strip. Note the blue tracer wire: this runs 150-feet to the ADU. The city plumbing inspector will be expecting to see this.
The right-hand backflow valve supplies city water to top-up the underground rainwater cistern over Portland’s long dry summers.
The main house supply pipe (copper) is located 6-inches below these other two feeds.
I also ran 1-inch PEX from this valve box, under the sidewalk, to the meter box in the parking strip. This would allow me to separately meter the ADU water supply at some point in the future without any further digging. You can see that line in the photo upper-right.
ADU Water Shutoff Valves

There needs to be a water shutoff valve located either within 5-feet of the ADU or in an accessible location within the ADU. As space is very constrained in the ADU I put the shutoff valves in a utility box at the back of the structure.
Portland City Water Meter
The City Water Department automatically upgraded my water meter located at the curb from 5/8″ to 3/4″ supply. They did this within a few weeks of the ADU permit being issued. There would normally be a hefty system fee for this upgrade however it’s waived for the moment to encourage new ADU development.,
